Pages

Wednesday 24 October 2018

Nothing Trembles!!

I kept watching Ninetta’s new Treble Stitches technique and patterns for a long time. I gone through Muskaan’s detailed study of the technique, but still I did not dare to try out Treble Tatting. One fine day I picked up a filled shuttle, watched Treble Tatting video and came out with a lace … it was totally unplanned….

Yes, I tatted Dot Picot String in between the rings, replacing the bare thread and the result was fusion of two techniques. What a wonderful tatting technique by Ninetta!!!! I managed to learn it easily from her video without trembling and would love to tat other treble variations.
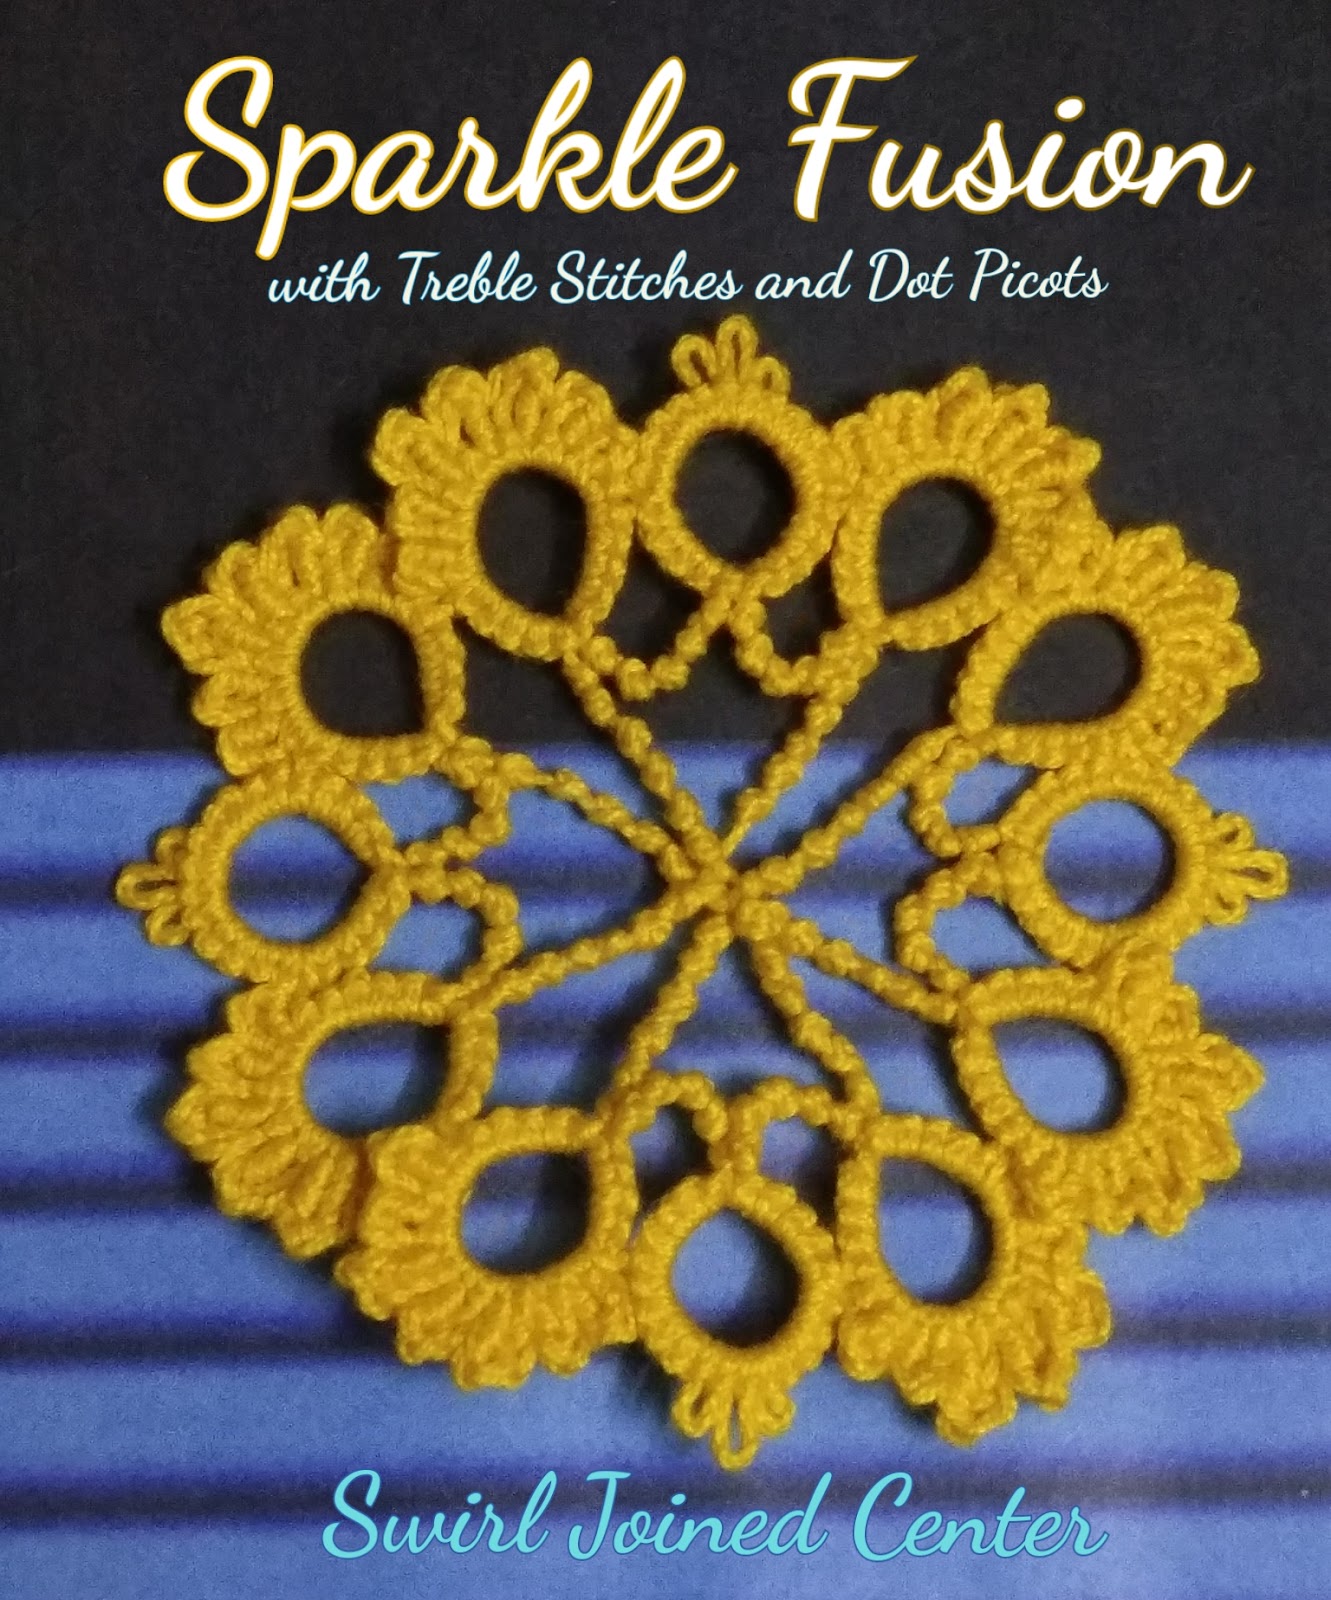
My next project - Sparkle Fusion-
  
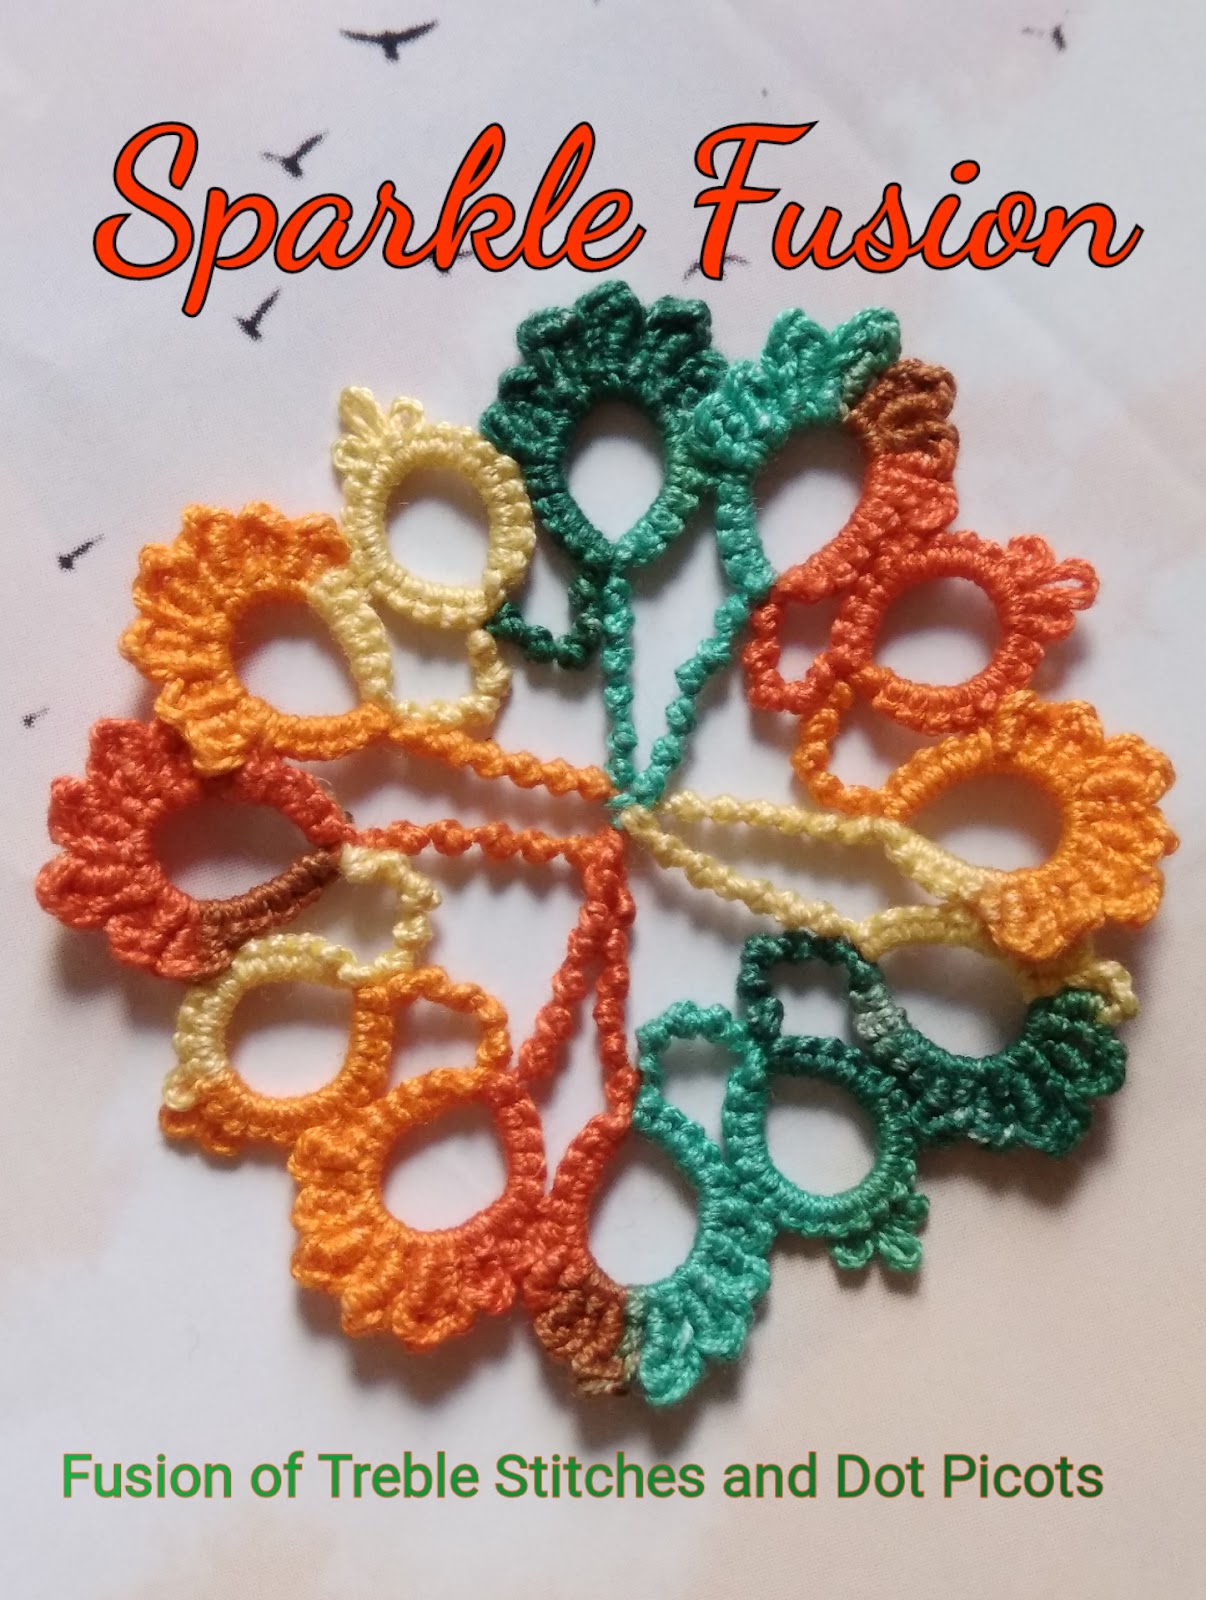
Find Pattern here- Sparkle Fusion
Tip: Dot Picot String can be replaced by 
        1.Tiny beads or 
        2. Keeping bare thread or
        3. Tatting lock chain stitches by adding ball thread 
Muskaan accepted to test tat my fusion motif. She has already mastered the treble technique and tried out many variations which are posted in her blog.
Ninetta too suggested few important changes in the written pattern like the first treble stitch starts with vsp etc….
I thank Muskaan for being so helpful in test tatting and pattern corrections. I thank Ninetta for sharing her wonderful Treble Tatting technique through videos and her blog. Also for helping me finalize the Sparkle Fusion.
Two variations with different centers as explained in PDF pattern.
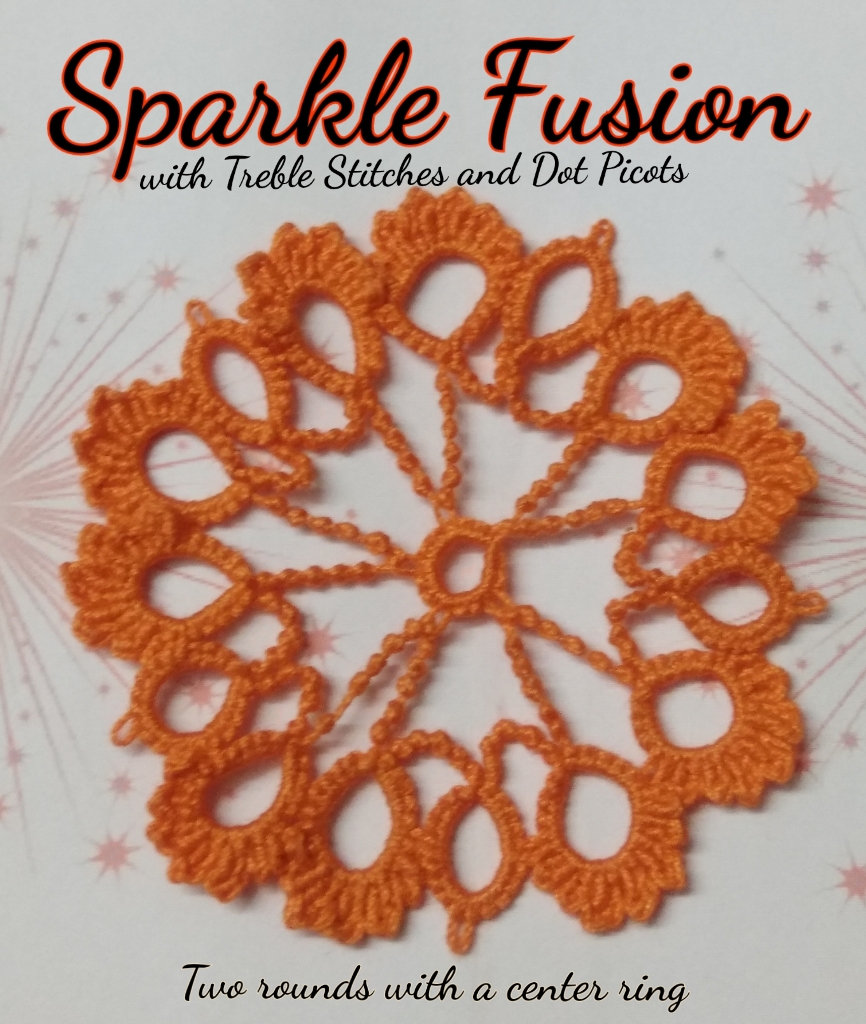

HAPPY TATTING ……...


Saturday 22 September 2018

Split Rings Mania!!

Hello Tatters,
Split rings fascinated me this time.
I worked on getting a perfect triangle using my own counts after few experiments.
The triangle can be tatted
 1) In single color thread and shuttles can be loaded with
      or without CTM (Continuous Thread Method)
    (without CTM will keep the beginning threads open for multiple uses)
 2) In two different color threads by winding separately on two shuttles.
 Remember to leave 3 inches thread on both shuttles before starting R1.
Pattern link- Split Rings Triangle
I have learnt Inkscape Diagramming from Robin Perfetti ’s tutorials.
  Many many thanks to Robin for such detailed explanation of each feature.
Her layers tutorial for triangle diagram was really useful.
I requested Robin to test tat my motif.
she came out with two versions of triangles- one in single color and other one in two colors.
1. Variegated color with CTM                           2. Two colors with open ends both sides
                            CTM will depend on the application of the motif and will be possible if the motif is tatted in single
(plain or variegated) color.(See Pic 1 above).
Open ends in the beginning do not require CTM. (See Pic 2 above)
CTM will help attach findings
or making a picot for a string as tatted in a barefoot sandal.
 
Thank you so much Robin for test tatting, diagram corrections and pattern writing.
Do post your comments, suggestions here….


ENJOY  TATTING


Tuesday 24 July 2018

Delighful Effects of CWJ

Dear friends, keeping in mind the soon approaching Indian festival of Rakshabandhan,
I found some new ways to use tatted motifs for ‘Rakhis’. Rakhis are basically bracelets
made with silk threads in vibrant colors. A sister ties Rakhi on the wrist of her brother to
show her true love. Rakshabandhan is a festival of love and  joy.
My focus was on Catherine wheel join (CWJ) technique while tatting new Rakhi motifs
and these are the designs I came up with.
1. The Chocolatees…....
The chains in second round in these motifs are joined with CWJ.
The effect of the CWJ can be seen with clarity of picot in the first round.
2. The simple yet elegant……
The white shiny thread gives an elegant look. The joins are made with CWJ.
3. The bare thread delight…...
Here’s a variation of color for the same pattern. I am happy to share this new effect of
bare thread over the rings and CWJ. Many tatters hate bare the thread idea but I am
sure that they too shall love this effect. I will share the pattern in my next post.
4. Dot Picot Delight....
Simple motif with six rings with single color. Join contrast color for the next round using 
Dot Picot String on upper part of each Ring joined with CWJ 
5. Variation with BareThread…….
Bare thread and two CWJs on each ring with and without beads.
6. Sandwiching the bare thread….

In the above two, one more round of chains with and without picots is added over the bare thread. 

The strings of all Rakhis are tatted with different techniques like Lock Chain Stitch, Pearl Tatting, Shoe Lace Trick etc.

Kindly post your views, comments, suggestions here.


HAPPY TATTING……………….


Wednesday 6 June 2018

Sunrise over the Ocean

I have been working with my newly found effect of CWJDuring my recent visit to Andaman Islands, I watched a beautiful sunrise over blue crystal clear water with white foam over it. The bright rising sun and the waves of the ocean fascinated me. For the first time I felt like capturing the nature’s beauty into tatting art.
And surprisingly  it looked like a Sunrise over the Ocean ………………..
                                       
Tatting of long and short loops alternately with  lp_cwj  came out like rays of the bright rising sun.
Sharing below a step by step pictorial of working of the sunrise motif.
 Pic 1- Round1-  Started with a half closed Maltese ring with two shades of yellow. RW
Pic 2- Round 2- Short loops with lp_cwj in each picot on the first round. RW
Pic 3 - gives clear pic of short loops of alternate color after completion of the 2nd Round.
Pic 4- Round 3- Last round with both long and short loops as shown.The orange thread  is inserted with overlay method  to get real effect of the Sun.
                                 
The motif had to be blocked and stiffened to get the perfect shape of the Rising Sun.
The waves were tatted with chains of alternate (white and sky blue) colors by switching shuttles.
Before actually tatting the sunrise with real shades, I did one trial with half closed ring with cool purple shades, which looked like a rising sun of some other Galaxy.
lp_cwj  can do wonders. Still lot more to explore.
Kindly wait to see my new creations with lp_cwj in the next blog post.

I welcome your comments, likes, suggestions here.

Happy Tatting 

Saturday 5 May 2018

The Joining Effect!!!


I am happy to share Charming Frills, the stunning effect created out of the combination of Long Picot(LP) and Catherine Wheel Join(CWJ).
The idea of this pendant  came up after tatting the basic onion ring in two colors. 
My first version was…....

Georgia’s Reaction after seeing the pic was…...
“OH how intriguing! I see a vague resemblance to needle lace and frisaso de valladolid but I have not seen in tatting as far as I can remember.”
 She found some resemblance to needle lace because of the frilly look of the pendant.

Muskaan helped me to find references of the effects of long picots tatted by other tatters. I started writing the pattern for the pendant with her. We both had lots of discussions online for naming this frill effect. Finally I used the notation lp_cwj for the presentation purpose. Layered long picots with Contrasting thread colors added beauty to the tatted pendant. The long picots tatted in multiples in consecutive layers gave beautiful frilled edging. This combo of Long Picot and CWJ can be used as a filler, multi-tiered, or as a frill/fringe.

Other joins like
1)    Catherine Wheel Join in Round 2
2)     Alligator Join in Round 3
3)     Picot Join in Round 4  
have been used along with other techniques like Thrown Ring, Split Chain, Shoe Lace Trick and Switching Shuttles to tat in one pass.

Picot on the thrown ring can be used to add a jump ring, a pendant hook or an earring finding.


Working of this joining effect - lp_cwj is shown in the pic below.
This frilled pendant is tatted in five rounds. Rounds 1-3 are worked in clockwise direction; round 4 moves from left to right and Round 5 moves from right to left, when seen from the front.

The detailed PDF Pattern Link - Charming Frills with step by step pics.


Its important to note the working of round 5, where we have to make the joins through the orange bars seen on backside. Insert a crochet hook through the orange bar from behind, pull up a loop to proceed.
Loads of thanks to Muskaan for test tatting Charming Frills and the immense help in finalizing the pattern. Kindly check her blog  to see her version of Charming Frills.
Using the same effect of lp_cwj, I tatted a medallion- Fringed Petals


I invite tatters to test tat this medallion.
kindly e-mail me - shuttlecreation@gmail.com
Feel free to post your comments , suggestions here.

HAPPY TATTING .......always.............

Tuesday 17 April 2018

Dot Picot Cross for Georgia


What a wonderful experience I had while working on The Cross diagram. The original idea of Georgia Seitz, Diagram by Jane Eborall, Muskaan’s help for finalising the pattern and there emerged a beautiful Dot Picot Cross with variations for the Online Tatting Class.
We had a great time learning the pattern and exploring new ideas with Georgia and other experienced tatters in the class today.
The Dot Picots give a graceful and ornamental look to the cross.

Original Cross idea from Georgia               Diagram by Jane Eborall


The PDF Pattern here-- Dot Picot Cross
      
The Pattern was so beautifully designed by Georgia, I could not resist trying out variations. 
The mock or floating rings on the center large ring and split rings at the bottom  have Dot Picots tatted with SCMR, Dot Picot on a Ring, ROR method. The two colored cross needed Double Core split rings instead of normal split rings.
See the detailed notated pics below…...


The cross with beads replacing the Dot Picots looks stunning too.

Close up of Beaded Cross
Another variation, I tatted a simple cross in two colors with normal picots and used a Triple Picot in the center top ring to give more decorative look to the pattern.

I wish you all try this lovely Cross pattern n enjoy tatting many more variations of your own.

Thank you so much

 Georgia, Jane and Muskaan

 for helping me complete this Dot Picot Cross Project with ease, creativity and perfection.

Do write your opinions, comments, suggestions here…..

HAPPY TATTING to ALL.


Monday 15 January 2018

Welcome2018 with Tat along1

Dear tatters,
Wish you all a Very Happy New Year 2018

Coquille was selected to tat along by my Indian Tatting group under the leadership of most senior tatter Madhur who tatted number of doilies over the years.

Here is my version of Coquille doily by Jon Yusoff Jan2014.
This is her free pattern, where the rows can be tatted by climbing out with split rings, split chains and mock rings. I tried to tat Coquille in one pass and with front side tatting without reversing for chains. Hope you can make out the difference. The doily ruffled at the end of last row, later blocked the same.
The pics below are taken while work in progress.......
1.Started the doily with one variegated thread, front side tatting and climbing out in each row.
2.Added similar shade of variegated thread in later rounds
3. 7th and 8th round tatted together using mock ring technique.
4. At the end the doily ruffled. Blocking helped.

This is by Madhur.....
The doily was enthusiastically tatted by everyone.

Enjoy the Coquille by different tatters in different colors here.......

By Kavita from Banglore
By Dheeksha from Bangalore
By Meenal from Gurgaon
By Smitha from Coorg
By Thilothama from Bangalore
By Anuradha from Bharuch
By Amrith from Coorg
I thank Jon Yusoff for sharing her beautiful pattern!!

A BIG THANK YOU from group 'HAPPY TATTERS' toooooo.

Happy Tatting......................